青瓷引擎的序列化功能是干嘛的?又该如何使用?同样拥有此疑问的新司机们赶紧跟随绿盟小弟的脚步往下看吧:
编辑器中保存游戏场景,保存预制对象,以及拷贝粘帖节点功能都是基于序列化功能的应用。即青瓷引擎可对任何游戏节点进行序列化和反序列化,场景的保存即对game.world对象进行序列化。序列化一个节点时将保存该节点,以及所有子孙节点信息,包括节点上挂载的脚本对象。
- 代码示例
以下通过代码演示对一个游戏对象进行序列化和反序列化的过程,这些工作由编辑器完成,用户不要直接调用代码。
节点序列化:
// 构建一个UIImage对象
var image = game.add.image();
// 设置一些属性
image.x = 234;
image.y = 567;
image.rotation = 1.667788
// 通过buildBundle将image对象转换json格式数据
var context = {};
json = this.game.serializer.buildBundle(image, context);
json.dependences = this.game.serializer.combineDependence(context);
var content = JSON.stringify(json);
以上操作后得到如下的content内容:
"{"class":"qc.UIImage","data":{"uuid":"6d4b3ef1-327c-40d4-b0bc-f3757257aa30","_prefab":[7,""],"name":[7,"UIImage"],"ignoreDestroy":[5,null],"alpha":[3,1],"visible":[5,true],"colorTint":[14,16777215],"static":[5,false],"scripts":[],"position":[0,0,234,567,234,567,100,100,0,0,0,0,0,0,0,0],"scaleX":[3,1],"scaleY":[3,1],"rotation":[3,1.667788],"interactive":[5,false],"isFiltersThrough":[5,null],"children":[],"texture":null,"frame":null,"imageType":[3,0]},"dependences":{}}"
节点反序列化:
通过以下代码可将json数据反序列化出UIImage对象和所有属性数据(引擎底层实现,用户不要直接调用)
var image = game.serializer.restoreBundle(json);
image.x === 234 // true
image.y === 567 // true
image.rotation === 1.667788 // true
- 可序列化的数据类型
目前支持如下数据类型的序列化和反序列化,一般在定义脚本类时对需要序列化的属性进行配置:
qc.Serializer.AUTO - 自动类型,设置为该类型时,内部将自动判断
qc.Serializer.INT - 整数
qc.Serializer.INTS - 整数数组
qc.Serializer.NUMBER - 数字
qc.Serializer.NUMBERS - 数字数组
qc.Serializer.BOOLEAN - 布尔类型
qc.Serializer.BOOLEANS - 布尔类型数组
qc.Serializer.STRING - 字符串
qc.Serializer.STRINGS - 字符串数组
qc.Serializer.MAPPING - 数值对
qc.Serializer.TEXTURE - 图集
qc.Serializer.TEXTURES - 图集数组
qc.Serializer.AUDIO - 声音
qc.Serializer.AUDIOS - 声音数组
qc.Serializer.COLOR - 颜色
qc.Serializer.COLORS - 颜色数组
qc.Serializer.PREFAB - 预制
qc.Serializer.PREFABS - 预制数组
qc.Serializer.NODE - 节点
qc.Serializer.NODES - 节点数组
qc.Serializer.POINT - 点
qc.Serializer.RECTANGLE - 矩形
qc.Serializer.CIRCLE - 圆
qc.Serializer.ELLIPSE - 椭圆
qc.Serializer.TEXTASSET - 文本资源
qc.Serializer.EXCELASSET - Excel文件资源
- 演示代码
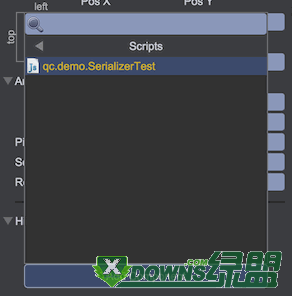
在Assets/Scripts目录下增加脚本文件:SerializerTest.js
代码内容如下:
var SerializerTest = qc.defineBehaviour('qc.demo.SerializerTest', qc.Behaviour, function() {
// 初始化字段值
this.intValue = 679;
this.intsValue = [77, 88, 99];
this.numberValue = 123.456;
this.numbersValue = [1.1, 2.2, 3.3];
this.booleanValue = true,
this.booleansValue = [false, true, false];
this.stringValue = 'QICI Engine';
this.stringsValue = ['A', 'BB', 'CCC'];
this.mappingValue = { firstName: 'eric', lastName: 'lin' };
this.textureValue = null;
this.texturesValue = [];
this.audioValue = null;
this.audiosValue = [];
this.colorValue = null;
this.colorsValue = [];
this.prefabValue = null;
this.prefabsValue = [];
this.nodeValue = null;
this.nodesValue = [];
this.pointValue = new qc.Point(55, 66);
this.rectangleValue = new qc.Rectangle(1, 2, 3, 4);
this.circleValue = new qc.Circle(100, 200, 33);
this.ellipseValue = new qc.Ellipse(11, 22, 33, 44);
this.textAssetValue = null;
this.excelAssetValue = null;
}, {
// 定义需要序列化的字段类型
intValue: qc.Serializer.INT,
intsValue: qc.Serializer.INTS,
numberValue: qc.Serializer.NUMBER,
numbersValue: qc.Serializer.NUMBERS,
booleanValue: qc.Serializer.BOOLEAN,
booleansValue: qc.Serializer.BOOLEANS,
stringValue: qc.Serializer.STRING,
stringsValue: qc.Serializer.STRINGS,
mappingValue: qc.Serializer.MAPPING,
textureValue: qc.Serializer.TEXTURE,
texturesValue: qc.Serializer.TEXTURES,
audioValue: qc.Serializer.AUDIO,
audiosValue: qc.Serializer.AUDIOS,
colorValue: qc.Serializer.COLOR,
colorsValue: qc.Serializer.COLORS,
prefabValue: qc.Serializer.PREFAB,
prefabsValue: qc.Serializer.PREFABS,
nodeValue: qc.Serializer.NODE,
nodesValue: qc.Serializer.NODES,
pointValue: qc.Serializer.POINT,
rectangleValue: qc.Serializer.RECTANGLE,
circleValue: qc.Serializer.CIRCLE,
ellipseValue: qc.Serializer.ELLIPSE,
textAssetValue: qc.Serializer.TEXTASSET,
excelAssetValue: qc.Serializer.EXCELASSET
});
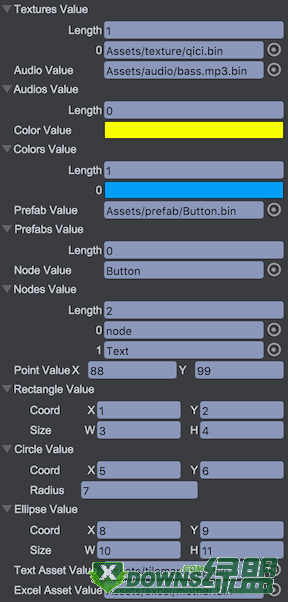
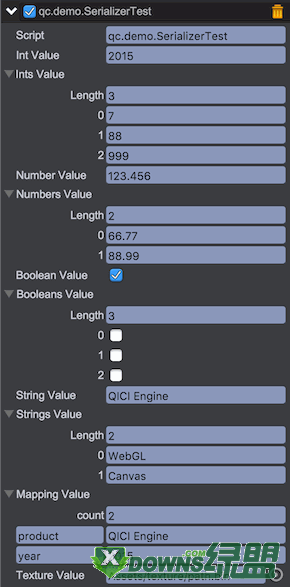
在场景中新建个空节点,并将此脚本挂载上去,编辑Inspector面板将自动显示需要序列化的脚本属性,编辑之得到如下结果:
- 自定义的属性
通过自己实现属性的写入、还原来达成,代码如下:
var SerializerTest = qc.defineBehaviour('qc.demo.SerializerTest', qc.Behaviour, function() {
// 内部属性值
this.xValue = 100;
this.yValue = 200;
this.zValue = 300;
}, {
// 定义需序列化属性名vector3d
vector3d: {
// 定义属性读函数
get: function(object) {
return [object.xValue, object.yValue, object.zValuke];
},
// 定义属性写函数
set: function(object, value) {
if (value) {
object.xValue = value[0];
object.yValue = value[1];
object.zValue = value[2];
}
}
}
});
上述代码序列化后,保存的信息是vector3d:[x,y,z],反序列化到内存中则表现为是对象的xValue、yValue、zValue。
文章来自绿盟(xDowns.com)转载请注明来路。
上一篇文章:青瓷引擎如何自定义界面逻辑脚本 自定义逻辑脚本教程 []